
This article explains the process of requeening your honey bee hive from a Requeening presentation given by Leah Taylor with UC Davis; the information reproduced here is used by permission for educational purposes. All images are this author's own except where noted.
Yesterday I attended a Requeening class taught by Leah Taylor through the University of California at Davis’ San Diego Extension program, the California Master Beekeeper Program. I’ve also requeened my hives before myself, so I know how touch-and-go it can be.
As you may know, the queen bee is the single most important bee in the colony because she is the only one who lays eggs – all of the bees (workers and drones alike) exist because she lays them. They are all descendants of her, and their health + temperament are directly related to her own health + mating/insemination history.

My current queens. Clockwise from top left: Queen Michele, Queen Margherita II, The Red Queen, and Queen Constance
Did you know that the queen bee is really a slave to the desires of the hive? The “hive mind” urges the workers to decide whether to keep her or usurp her, and it even controls what type of egg she lays since they build as much drone comb (larger cells) as they see fit. She then lays unfertilized or drone eggs into those larger cells.
The queen has no maternal instinct; in fact it is her daughters, the nurse bees, who take care of the new eggs, larvae + pupae. They even take care of the queen herself.

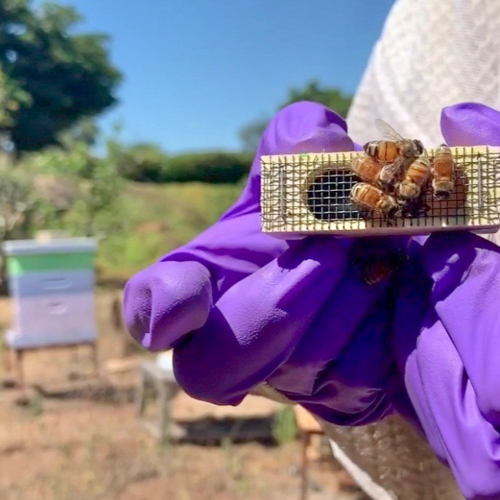
A worker bee attending to her queen through the mesh of a queen cage.
Bees are so enamored with their queen that requeening them has been called a “laborious, time-consuming task that often fails, even when undertaken by experienced beekeepers.” (From ABC + XYZ of Bee Culture, p. 725). The goal is to improve your odds.
So Why Requeen?
Colony Health.

A colony that has succumbed to Parasitic Mite Syndrome.
Requeening solves many brood disease issues because it results in a brood break. Your queen should be genetically superior to the replaced queen, however.
Under Performance.
Perhaps the queen is just not performing well (spotty brood pattern or drone-layer), or her brood are not good producers. Requeening can prevent an escalation in future problems.
Temperament.
If your colony is locally defensive (the new + preferred term for “Africanized”), replacing the queen with known docile genetics can solve the problem; but it may take 4-6 weeks for the colony to calm down.
Apiary Expansion.

Apiary photo from UC Davis + used by permission
To grow your apiary, split a hive + replace the queenless half with a queen you trust. In locally defensive regions like San Diego, you can’t let your bees make their own queen – she will mate with feral drones so the offspring will likely be defensive as well.
Technique.
Timing.
Fall is the best time of year if you have the option, as queens are generally laying less + her pheromone will be reduced. Obviously requeen any time of year you need to; this is more for the optional requeening due to performance or splitting.
Time of day should be afternoon when most or the foragers are out of the hive.
Reduce the current queen’s pheromones.
Bees remember their queen for a minimum of 24-36 hours, so remove her at least that far in advance. Also, do NOT kill her on site – in addition to opening yourself up for repeated stings by her, you are risking her setting off her own alarm pheromone that will alarm her workers. Remove her from the area or toss her in the smoker (easier said than done – I have yet to “off” any of my queens.)
Reduce the size of the colony you’re introducing her to.
Generally the more bees there are in a colony, the more difficult her replacement will be, due to the magnitude of the chemical narrative within the hive. This is doubly so for locally defensive colonies.
What if you can’t find the old queen???
Finding her can be challenging. If you are overwhelmed with defensive bees, split into nucs by half or even into as many as four nucs. Come back the next day and check again.
Another option is to put down a new, empty brood box (with frames clean of bees) and top it with a queen excluder. Place another brood box on top of that and shake off the frames from the colony into it one by one. Then apply smoke. They will all go down into the bottom chamber except the queen (and drones) because she won’t be able to fit.
A third option is the white sheet method: dump all your bees out onto a white sheet leading up to the entrance and simply watch them all march back inside. Not only will your queen be slower, she will also have a retinue surrounding her that will stick out like a sore thumb.
New Queens.

Your new queen should be a purchased, mated queen from a reputable breeder. She will often be be over-nighted with attendants, but success in having her accepted by the colony goes up the fewer attendants she has with her at the time of transfer.
If you’re storing her overnight, don’t let her get chilled. Remember, “if you’re cold, they’re cold.” Turn off the A/C or put them in a cabinet where the house is heated. Keep noise + light to a minimum. Feed honey droplets as needed overnight. DO NOT let the queen get soaked in honey – put a drop where her attendants can drink it; they will feed her.

Preparation of the Apiary.
Make sure you prepare a nucleus hive for your new queen’s introduction + put it in the spot the hive will live permanently. This can be only a few feet from the old hive location.

Leave an empty box with a few resources to catch the field bees from the original hive; they are the most resistant to the new queen and are generally on their last week or two of their lifecycle.
Include the following in your nuc:
- a feeder with sugar syrup,
- a frame of empty but drawn comb,
- a frame of pollen/nectar mix (1/4 of a pollen patty is ok), and
- 2-3 frames of brood + nurse bees.
Method.
1. Prepare queen cage. After 24-36 hours of dispatching with old queen – during which time you’ve set up the new nucleus hive, you should TAPE the candy end of the queen’s cage over with duct tape. This is so YOU control her release.

2. Place the cage near the top of a brood frame, candy + screen-side UP.

3. LEAVE her one full week. This video shows me putting her in; she was tiny because she was in a queen cage, so she couldn’t lay. Don’t be as alarmed as I was about the small abdomen on your purchased queen! 😉
4. After one week, remove the duct tape +/or remove the cork. You should see signs that the bees like her: heads down, tongues out, and they can be brushed off the cage easily.
Signs they have NOT accepted her include stingers down, biting, and being impossible to brush off her cage. It may look like they are balling her.
5. REMOVE any supersedure cells.

6. Refresh syrup/pollen patty if needed.
7. Close the box + wait another full week.
8. Next, check for the queen being out, and preferably for eggs.
9. REMOVE any supersedure cells. Yes, again.

10. Once queen is laying the requeening is a success, but you’ll need to check WEEKLY to ensure that the bees are not making supersedure cells. They always want their genetics to win, and she is not of their genetics. It will take weeks before the turnover is complete.
11. Once the nuc is almost full, transfer all framed into a larger hive body (when it is 80% full).

Keep an entrance reducer on at all times until the hive is larger.
12. Augment with nurse bees from another colony if you like. Just make sure they aren’t foragers (on honey frames).
Continue to look for eggs, and keep up your routine MITE treatments.

For questions please leave a comment. The following resources are also excellent to get you feeling secure about requeening:

Thanks for looking, and lots of luck requeening! xoxo


